Avoid Back Pain While Shovelling Snow

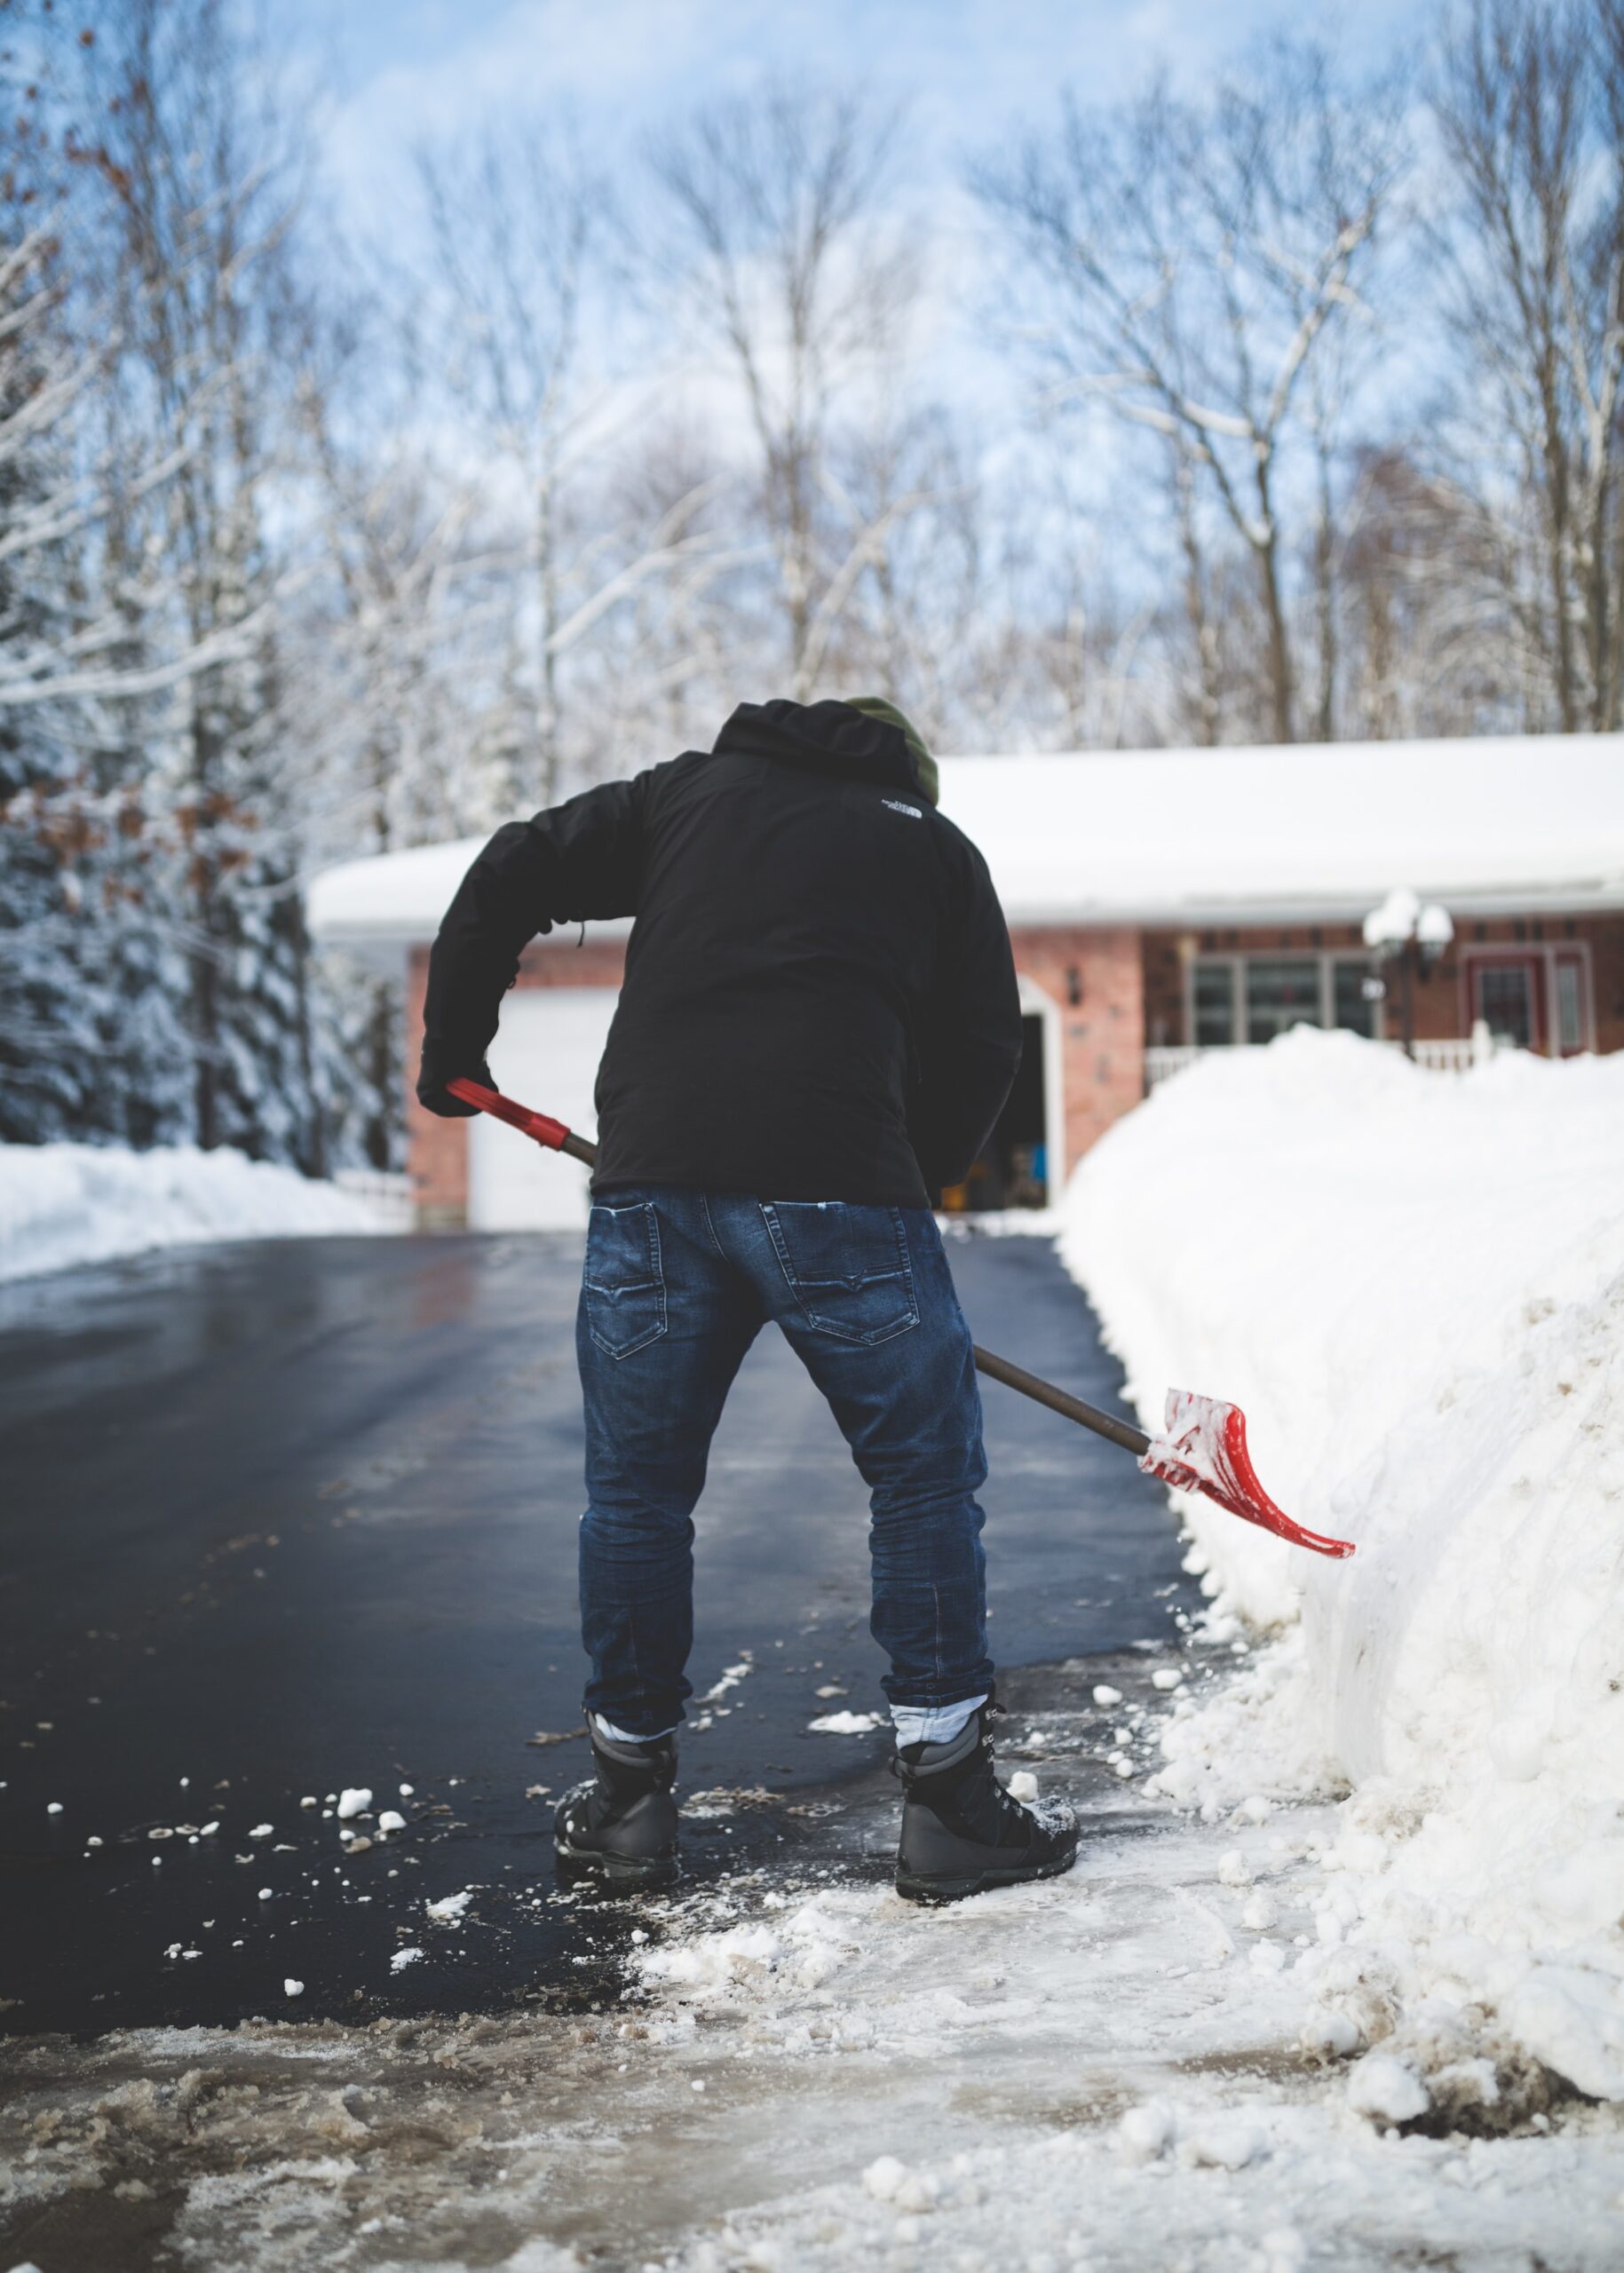
As the seasons start to turn, we sometimes forget things from the year before. In winter, we may underestimate the preparation needed to tackle the snow and ice. We might forget our mittens, we might forget the proper footwear for damp and slushy streets, or we might forget our posture when it comes to maintaining our sidewalk or driveway.

Snow and ice create a hazardous situation for everyone. Shovelling and using salt, sand, or other ice-melting substances (like kitty litter) help to reduce the potential for slip and fall accidents.1

Apart from dressing properly for the weather and making sure you have a sturdy, lightweight shovel, there are a few practices you can follow to help make snow-shovelling safer1,2:

  • Stand with stability: Stand with your feet at hip-width apart to maintain your balance. It’s also best to wear boots that are non-slip when you shovel. This will help protect you from sliding when shovelling.
  • Keep the weight close to your body: Hold the shovel close to your body to guard against straining or pulling a muscle. When the snow is deep, try to shovel smaller amounts (3–5 centimetres/1–2 inches) of snow at a time.
  • Grip strategically: Space your hands apart on the handle to increase your leverage when lifting the snow.
  • Lift with your legs: Bend from your knees, not your back, when lifting. Not only does it protect your back, but you can strengthen your legs as well!
  • Engage your core: Tighten your stomach muscles when lifting snow. This helps to protect your back as you lift.
  • Don’t twist: Avoid twisting your body when you lift. Move your feet instead to turn your body.
  • Don’t fling the snow: Make sure to walk to place the snow on the side of the path rather than throwing it. Turn your feet in the direction you’re dumping the snow—this better positions you to maintain good form. Your whole body will thank you.

Snow shovelling can be a very strenuous activity, and even more so without the correct, protective form. Ask your chiropractor for more tips on improving your strength and stability.

With the proper preparation, tools, and technique you can make shovelling safer for you, and your walkways safer for your family, friends, and neighbours.

Happy shovelling!

References

  1. Snow Shovelling. Toronto Paramedic Services. Available at: https://torontoparamedicservices.ca/safety-tips/snow-shovelling/. Accessed October 24, 2016.
  2. Shovelling. Canadian Centre for Occupational Health and Safety. 2011. Available at: https://www.ccohs.ca/oshanswers/ergonomics/shovel.html. Accessed October 24, 2016.

Copyright, Canadian Chiropractic Association

Bad Habits That Cause Poor Posture

I have recently been working Tim Begley, founder of Positive Shift Fitness.  He is an excellent kinesiologist and personal trainer in the North Burnaby area and a great resource for my patients.  We are spending some time producing videos which we believe are relevant to our patients.

This first video addresses posture.  This is probably the most common concern I see in my practice on a daily basis.

We discuss common causes of poor posture and the symptoms we frequently see.  We finish the video with tips to relieve and prevent these issues.

Hope you enjoy it!

Stretches for golfers

At this time of year, I hear a lot about golf, both from my husband and from my patients.  When spring weather arrives, golfers flock to the courses, eager to get back to their favourite hobby (I’d say obsession…).   The most common complaints I hear from them are low back pain and elbow irritation due to the large movements and repetitive strain associated with their sport.

The Canadian Chiropractic Association has produced an excellent article with four easy stretches to perform before, during and after a round of golf.  I have copied the information below.  It can also be found on the CCA website at:

These stretches are a great place to start.  If you are still experiencing discomfort, please come in for an appointment.  I’ll take a look and see if I can help get you back into the game at full swing.

1. Hip Flexor Lunge

Stand with your feet shoulder width apart. Step one foot forward into a lunge position. Keep your body upright and back straight. Bend both knees so that you feel the stretch. Do not let your forward knee pass over the ankle of your front foot. Use a golf club to keep your balance. Hold 15 seconds. Repeat twice on each side

golf-1

2. Seated Twist

Sit on a bench or golf cart with your knees together and feet flat, pointing forward. Reach across the front of your body and grasp the back of the bench or cart. You should experience a stretch in your spinal muscles. Hold 15 seconds. Repeat twice on each side.


golf2

3. Seated Forward Bend

Sit on a bench or golf cart, knees bent and feet flat. Place one ankle onto your opposite knee, and relax this leg so that your knee falls out to the side. Slowly bend forward, keeping your back straight. You may gently pull on your bent knee to generate a deeper stretch. You should feel a stretch in your buttock area. Hold 15 seconds. Repeat twice on each side.

golf3

4. Side Bending Stretch

Stand with feet shoulder width apart. Hold the golf club above your head with your arms straight. Slowly bend to one side, without rotating, until you feel a stretch along the side of your back. Hold 15 seconds. Repeat twice on each side.


golf4


Gardening tips for back and body health

Gardening Tips

Those of us living on the West Coast have been spoiled with gorgeous spring weather while most of the country has dealt with a long, cold winter and many snowstorms.   We are well into gardening season here and I have started to see a few patients who are experiencing soreness related to planting and weeding.

The Canadian Chiropractic Association has produced a great article with tips on reducing soreness while gardening.  I have copied the information below.  It can also be found on the CCA website at:   http://www.chiropractic.ca/resources/plant-rake/

Plant & Rake – Canadian Chiropractic Association (CCA) – Association chiropratique canadienne

Gardening is a great outdoor activity anyone can enjoy. But, like any other location in the home, the garden is also a place where injury can occur. These helpful tips will keep your back in check and your garden in bloom.

Warm Up Before you Start

Before you get going, warm up your muscles with a brisk 10-minute walk around the block or even on the spot. Swing your arms and lift your knees to enhance the benefits.

S-t-r-e-t-c-h

Your Sides

  1. Extend your right arm over your head.
  2. Bend toward the left from the waist.
  3. Hold for 15 seconds and repeat on the other side.

Your Thighs

  1. Steady yourself against a tree, wall or railing.
  2. Bend your right knee and grasp the ankle with your left hand.
  3. Hold for 15 seconds and repeat with your left knee.

Your Back

  1. In a seated position, bend forward from the hips, keeping your head down.
  2. Touch your fingers to the ground.

Your Wrists

  1. Hold one arm out in front of you, palm down. Bend your wrist until the fingers point to the ground. Use your opposite hand to hold this position.
  2. Hold one arm in front of you and place your palm in the “stop” position. Use your opposite hand to hold this position.
  3. Place your hands in “prayer” position, and press your palms together.

Your Arms & Shoulders

  1. Let your arms hang loosely at your sides; rotate your shoulders back and forth.
  2. Hug yourself snugly and slowly rotate at the waist to the left and the right.

If you experience back pain that lasts more than a few days, consult a chiropractor for an evaluation. Locate a chiropractor in your community.

The Right Moves

Bend Your Knees to Lift With Ease

Before lifting, position yourself close to the object. Keep your back straight and bend your knees using your leg and arm muscles to smoothly and slowly lift the load. Keep the load close to your body and pivot – don’t twist – to turn.

Stay Hydrated

Drink lots of water to keep your body well hydrated. The discs of your spine require water to keep them cushiony and functioning properly.

Take a Break

Rest when you’re tired and take time out for stretching to loosen tense muscles.


Running outside

Injury Prevention for Runners

I have been involved with the SunRun clinics in Burnaby and Vancouver for the past 8 years as a guest speaker on injury prevention.   The clinics are always a great group of runners, walkers and leaders, all out to support each other on reaching their fitness goals.   I have shared some of the highlights from my presentation in this blog.  Many thanks to SportMed BC for their assistance in the preparation of this material.

The most common injuries to runners are:

  • Patellofemoral Syndrome – pain or tenderness underneath or along the sides of the kneecap.
  • Plantar fascitis – pain under the sole of the foot or the heel due to overstretching of the plantar fascia.
  • Shin splints – aching along the inside of the shin due to overstressing of the lower leg muscles.
  • Iliotibial band (ITB) syndrome – pain along the outside of the knee.
  • Achilles tendonitis – pain along the back of the Achilles tendon due to stress in the area and build-up of scar tissue.

There are individual hints for each of these conditions, but prevention is the key to avoiding most injuries.

Prevention Tips from a Sports-Focused Chiropractor

Warm-up

A good warm-up reduces the tension in your muscles, allowing much easier movement and preventing strains.  It also prepares the muscles for the upcoming activity.  A warm-up should include:

  • 5-10 minutes of light exercise (low intensity walking, slow jogging or cycling).
  • Approximately 5 minutes of light stretching. Be gentle with the stretches during the warm-up as your muscles are not yet as warm as they will be later in the workout.

Cool-Down

The main focus of a cool-down period is to ensure that blood does not pool when you stop activities too quickly.  Make sure that you gradually decrease the intensity of your workout.

For runners, follow this progression: running, slow jogging, fast walking, slower walking , stretching.  A similar progression is possible with most sports.

This is also a good time to work on your flexibility, as the muscles are warm. Spend approximately 15 minutes stretching at the end of your workout.

Stretching Tips

  • Move slowly into stretches, paying attention to avoid bouncing.
  • Hold each stretch for at least 15 seconds (30 seconds or up to 2 minutes is even better). Repeat the stretch at least 3 times.
  • Be sure to breathe slowly and exhale when holding a position.
  • At no time should pain accompany any of the stretches. If it does cause pain, discontinue and ask for assistance. There are always adaptations and different positions to try to stretch each muscle group.  Please ask me for specific stretches suited to your activity and needs.

Footwear and Running Surface

  • The ideal running surface is soft and level, such as a gravel road and a bark mulch trail. Uneven roads, uphill and downhill routes all have their own concerns. Use caution when you run on them.  If you run on a sloping road, change directions on alternating days.
  • Proper footwear is an important component. Think of your shoes as part of your exercise equipment. Monitor the wear pattern on your shoes to see if you are placing more weight on the inside or outside of your feet.  If you notice any strange wear patterns or find that your feet are consistently sore during your workout, speak to a trained staff member at a running store.
  • If you over-pronate (roll onto the inside of your foot), look for a motion control shoe.
  • If you require further support, consider being evaluated for orthotic use.

Cross Training

  • Ensure that you have an adequate stretching and strengthening program. This should be in addition to the stretching done with your runs.
  • While running increases the strength of the calf, hamstrings, and back muscles, it does not focus on the development of the shins, quadriceps and abdominal muscles. Additional conditioning that stretches the first set of muscles and strengthens the second set will help accommodate for the strength and flexibility imbalances developed with running.  Gym workouts are a good option.

Taking Care of Yourself

  • Be nice to your body. While it is great to have ambitious goals, physical activity has to be increased gradually.  Speak to the SunRun leaders if you are having difficulty with the progression of the program.
  • Pay attention to any pain that you experience. While some muscle soreness can be expected, do not ignore any potential injuries.
  • If specific areas are consistently bothering you after a run, have it looked over by health care professional such as a Chiropractor, Physiotherapist or Registered Massage Therapist. Book an appointment sooner rather than later. It is much easier (and less time consuming) to treat an injury in the early stages than it is to deal with a condition that becomes chronic.
  • Do not try to run through an injury or illness. Take a few days off if you are suffering intense pain or if you have a fever associated with a viral infection.
  • Get extra sleep and rest. You will need it as you increase your physical activity level.
  • If dealing with a chronic or recurring injury, you need to focus on reducing inflammation. Modify your activity as needed, decrease the intensity of your workouts, and correct training errors to ensure that you are not irritating the area further. Ice the area for 20 minutes at a time several times a day, particularly after an aggravating activity (such as running).

Dealing with an Injury

Despite our best efforts, some injuries do occur. When dealing with an acute injury, remember RICE: Rest, Ice, Compression, and Elevation.

  • Rest – stay off the injured area and seek diagnosis and treatment from a health care practitioner.
  • Ice – for 20 minutes at a time, with an hour between applications. Ensure that a towel or cloth rests between the ice and your skin.
  • Compression & elevation. If you have injured an extremity, wrap an elastic tensor bandage around the area and rest it above the level of the heart. This will help to reduce swelling. Remove the bandage before going to bed.
  • Do NOT apply heat to a new injury for the first 72 hours. This includes hot baths, whirlpools and heating pads.  Heat can result in increased inflammation.

Returning to Activity After an Injury

  • The first step in assessing your recovery is performing pain-free range of motion. If you are experiencing pain when simply moving your low back, ankle or shoulder, you will not be able to tolerate the demands of your sport.
  • Compare your strength, speed and coordination to your other side. Most sports have return-to-injury guidelines established. Speak with your personal trainer, coach and/or therapist regarding your specific activities.
  • Return to exercise SLOWLY. Overcome the frustration of starting back slowly – your body will thank you for it.   You will need to modify your workouts to avoid any aggravating movements.
  • Continue with any rehabilitation exercises you have been given. Many people believe that they do not need to keep up with these exercises once they are back in the game.   Those exercises are often the key to stabilizing injury-prone areas, increasing core strength, stretching, and avoiding strained muscles.


If you are interested in learning more about chiropractic care, please contact Dr. Ann Izard to reserve your consultation.